Sew a Gathered Skirt Without a Pattern
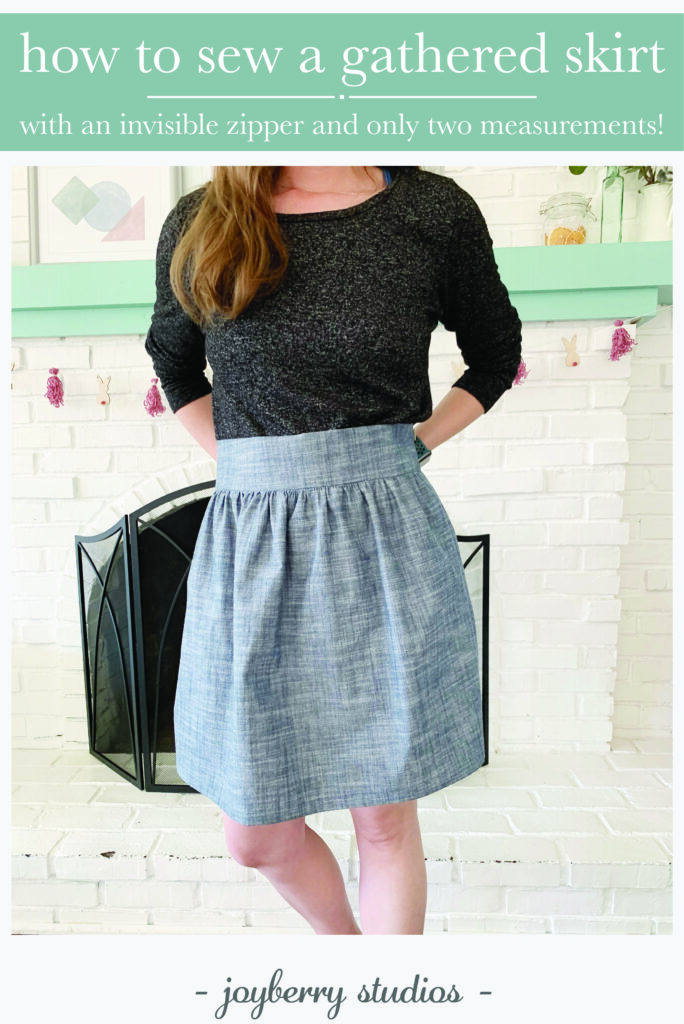
How to Sew a Gathered Skirt Without a Pattern
My sister and I started our own “sewing school”. Every month we decided to dive into making a new garment! This month, I figured out how to sew a simple gathered skirt without a pattern, and I wanted to share the steps with all of you!

For the first month we chose, Shirt No. 1 by 100 Acts of Sewing. It was an easy first garment. Here is my blog post about it.
For the second month we wanted to do a skirt. My sister kept sending me patterns that she liked, but they were all simple gathered skirts, which I knew I could easily make a pattern for.
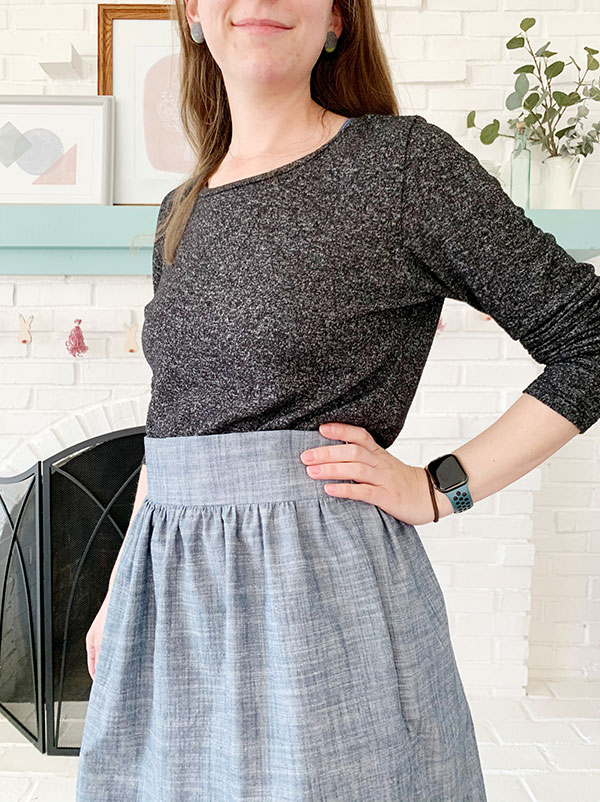
Let me show you how to sew a gathered skirt without a pattern. All you need is two body measurements and you can easily make this pattern for yourself. I also included some flexibility in the directions so you can make the skirt more or less full (aka use more or less fabric) and you can modify the length (daring mini skirt from the 90’s or full length boho chic).
It also includes a side invisible zipper. Zippers can be totally daunting at first! I will walk you through how to install one. The technique to sew invisible and standard zippers is the same. If you’ve sewn one into a bag, you can sew one into a skirt!
Fabric & Zipper
For a garment like this you want a drapey fabric. If you choose a stiff quilting cotton it may just balloon out at the gathers and will look a little stiff and big and just awkwardly poof around your body. Quilting cottons are so fun and tempted to sew with, but they work best for more fitted garments.
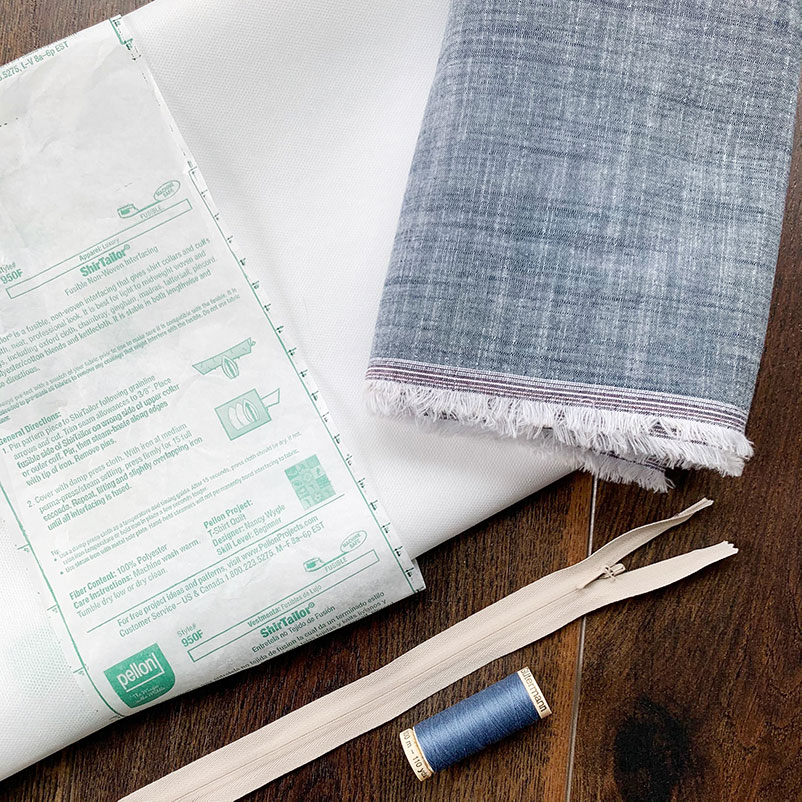
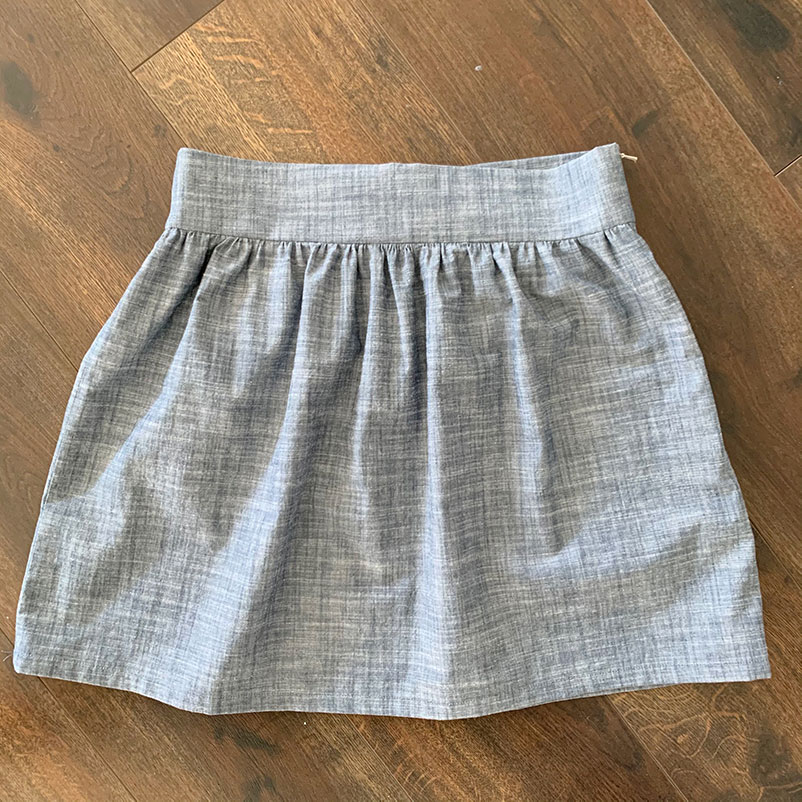
I chose this Chambray Union Yarn Dyed fabric in indigo from Robert Kaufman. It has great drape, it is pretty cheap for garment fabric, and it is 57” wide.
With the measurements calculation I was able to cut the front and back of my skirt with one single width cut of the fabric. It left me enough to make a pair of shorts and this skirt out of just one yard!
You will determine how much fabric you need to have based off of your pattern pieces (later in this post) and how wide your fabric is. It may involve some calculations, but you can do it!
Other great fabric options for this skirt would be a linen, rayon, double gauze, or even fabric from sheets if they feel drapey enough! Be adventurous!
You will also need an invisible zipper for this project. The zipper will be on the hip, it would be weird to have a normal zipper just on one side. For non-metal zippers you can always buy them longer than needed. I purchased 20” invisible zippers in bulk from ZipIt on Etsy. I chose an off white color so I could use them in a variety of different projects (like these pillows!)
Interfacing
You don’t have to use interfacing if you don’t want to. It just helps the waistband hold its shape a little better and with the stress of pulling up and down the side zipper.
I like to use the 950F ShirTailor Fusible Interfacing from Pellon. It is made to stabilize light to midweight wovens and knits. It’s also fusible, which means you just iron it onto your fabric.
Measurements

The first measurement you will need is where you would like the skirt to sit on your waist. I chose just below my belly button. Make sure you are measuring the distance around your body. I will refer to this measurement as your WAIST measurement.
You can take this measurement with a soft tape measure or just use a string and measure the length of the string on a ruler.
The next measurement you need to take is from your waist (where you want your skirt to sit) to where you want it to hit on your leg. If you are a little nervous about this length, always cut your fabric a little longer and adjust the hem or trim it later. I will refer to this measurement as your LENGTH measurement.
Pattern Pieces for Sewing a Gathered Skirt without a Pattern
Great news, this pattern is just TWO rectangles! I am a math person (please don’t hate me) so I wrote out some calculations.
Waistband Width = WAIST + 1 inch
Waistband Height = 6 inches
Front/Back Width = WAIST x 2
Front/Back Height = LENGTH + 1 5/8 inches
For the waistband width take your WAIST measurement and add 1. This is to account for the fabric lost in the side seam allowance and to add a bit of ease into the garment. The waistband height is 6 inches. This will be folded in half and some of the height will be lost in the seam.
For the front and back body width of the skirt take your WAIST measurement and multiply it by 2. This will give you the extra fabric for your gathers and you need this fabric if you want to move your legs and walk.
You can do a few inches less or more than the suggested width on the front/back pieces. I did a few inches less. My fabric was 57” wide, so I knew if I folded it in half it would be close to 28.5”. This was a few inches shorter than my suggested measurements, but I wanted to save fabric, so I just went for it. The more width your fabric has the more full your skirt will be.
For the front and back body length of the skirt take your LENGTH measurement and add 1 5/8 inches. This is to account for the fabric lost in the top seam and the bottom hem.
Cutting Fabric & Interfacing
Interfacing gives fabric a bit more strength and structure. It is used with closures (buttons & zippers) and pieces of clothing that should lay flat and have shape (collars, formal cuffs, waistbands).
You should now have your measurements for the waistband and the front/back pieces. Cut ONE waistband and TWO front/back pieces out of your fabric.
You also need to cut some pieces of interfacing. For the waistband, cut one piece of interfacing that is your Waistband Width x 2.75 inches. For the zipper reinforcement cut two pieces of 1”x7” pieces of interfacing.
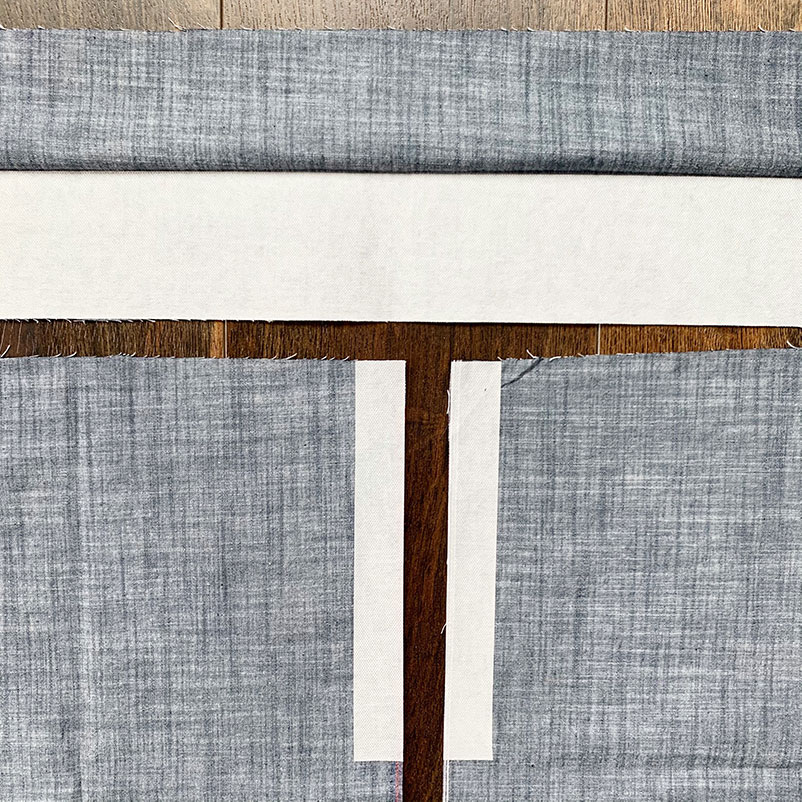
Use your iron and adhere the waistband interfacing to the wrong side of the bottom 2.75” of the waistband fabric. Adhere the zipper interfacing to the wrong side of fabric on each the front and back pieces. It should be on the side of the fabric, where your zipper will go.
How to Sew a Gathered Skirt Without a Pattern
First Side Seam
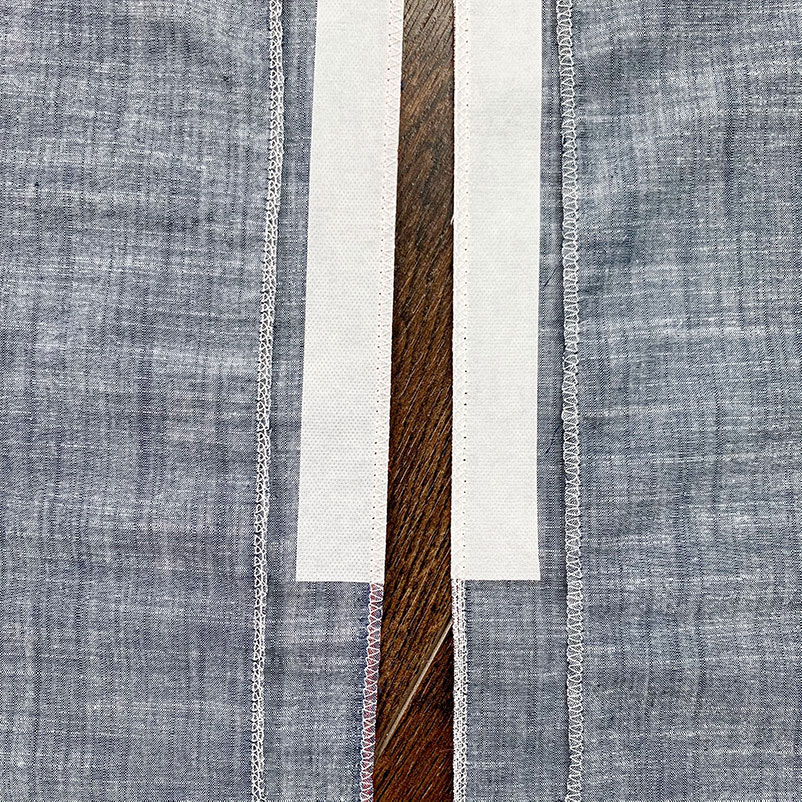
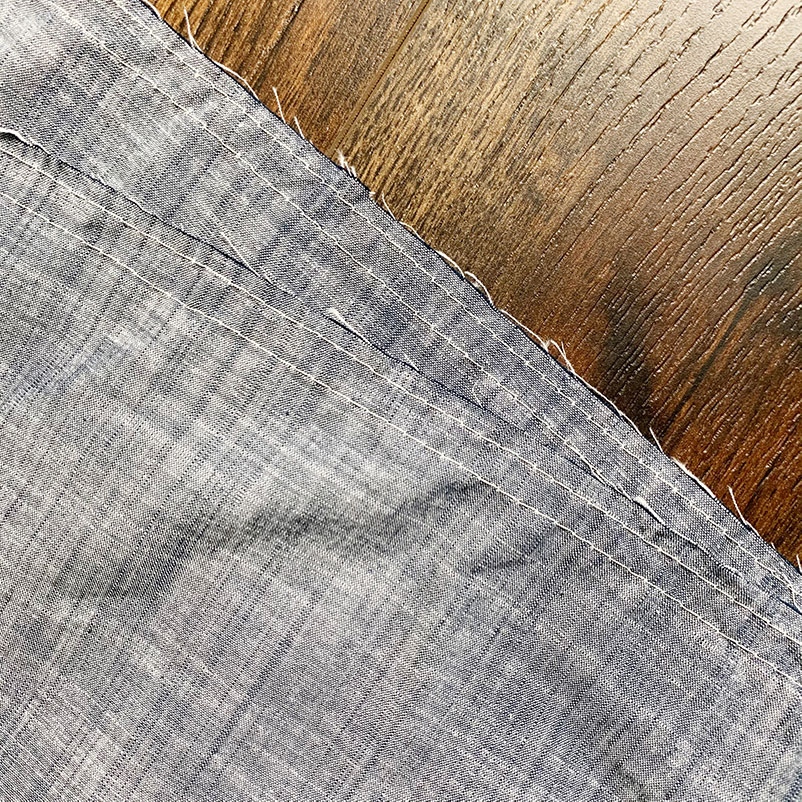
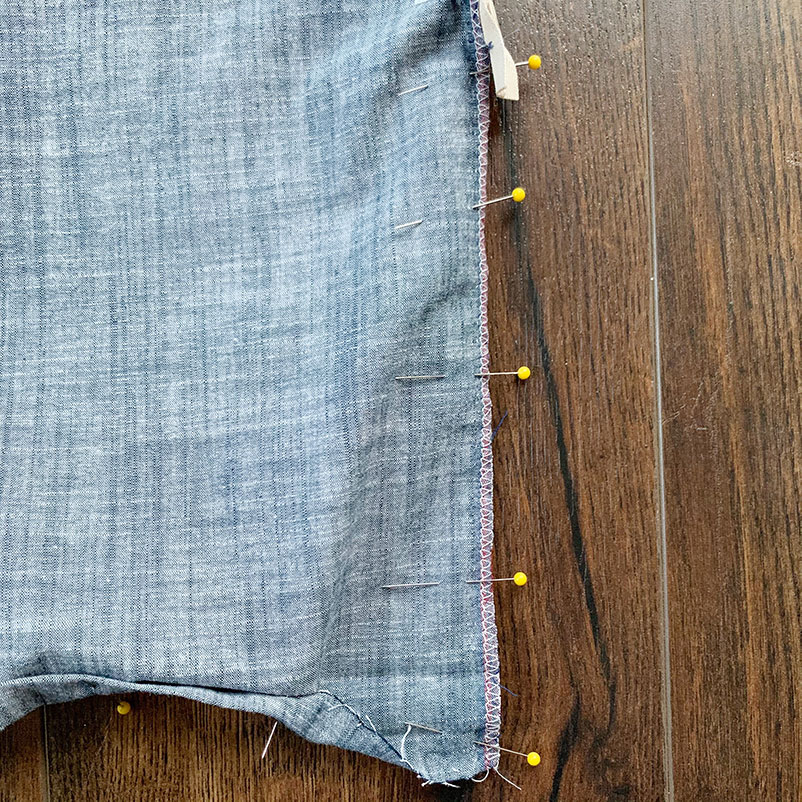
First thing you need to do is finish the side seams on the front and back pieces of the skirt. If you like to press finished seams apart, I find it easier to finish them separately before sewing them together. Finishing sides before sewing also ensures that the fabric doesn’t fray while you are working with it. I just did an overcast stitch on my sewing machine. This is a fun place to use contrasting thread (a great way to use up scrap thread!)
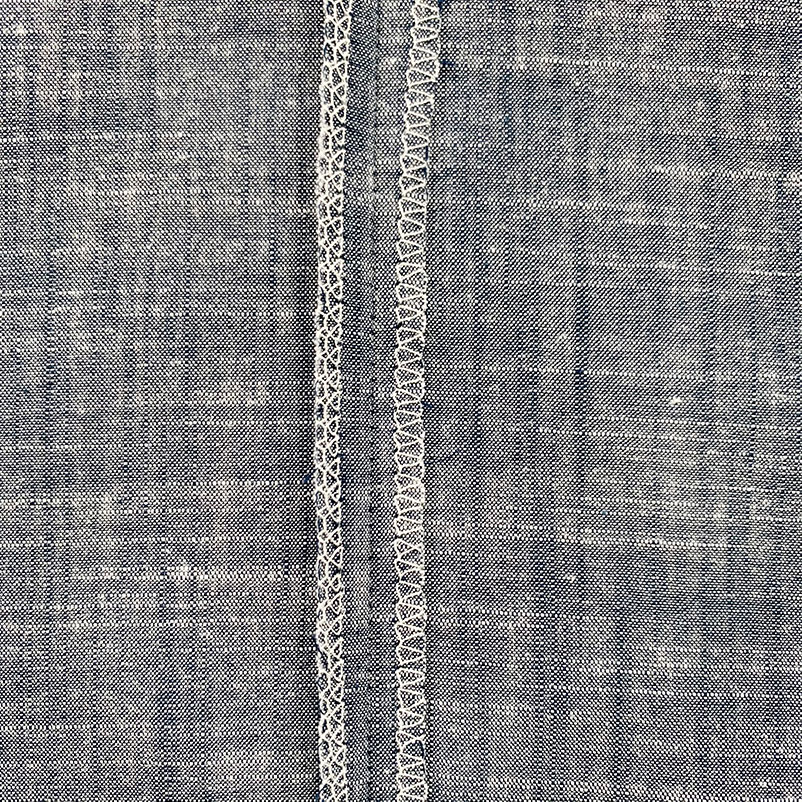
Sew your front and back pieces together at the side seams with a ⅜ inch seam allowance. Be sure that your fabric is right sides together! Press this seam open.
Prep Gathers
Set your machine to the longest stitch length possible and make sure your bobbin thread and top thread are both pulled out a little bit. You will want to be able to hold these threads when you make the gathers.
Sew two lines down the top of your front/back pieces at ¼ inch and ½ inch. You want to make sure you leave around 6 inches of thread at the beginning and end. Don’t forward and back stitch.
Pin & Sew Gathers
Mark the center of the front and back pieces with a pin. On the waistband, mark the center, and then half way between the center and the sides. I do this easily just by folding the fabric in half to find the middle and then in half again to find the 1/4 and 3/4 way through the skirt.
It doesn’t have to be perfect. The waistband should have three pins in it, breaking it up into four even pieces. These markings allow you to line up the gathers a little better than just winging it.
Hold onto the fabric and gently pull the bobbin thread from the gather stitches you just made. Your fabric will begin to bunch up. Continue to gently pull and redistribute the bunching down the skirt. Pull the bobbin threads on each side to complete the gathers. You want to gather the front and back pieces until they are the same length as the waistband.
(If you’re having trouble figuring out which thread is the bobbin thread, it is the one that is easier to pull on. If you can’t seem to move the fabric, you’re probably pulling on the wrong thread.)
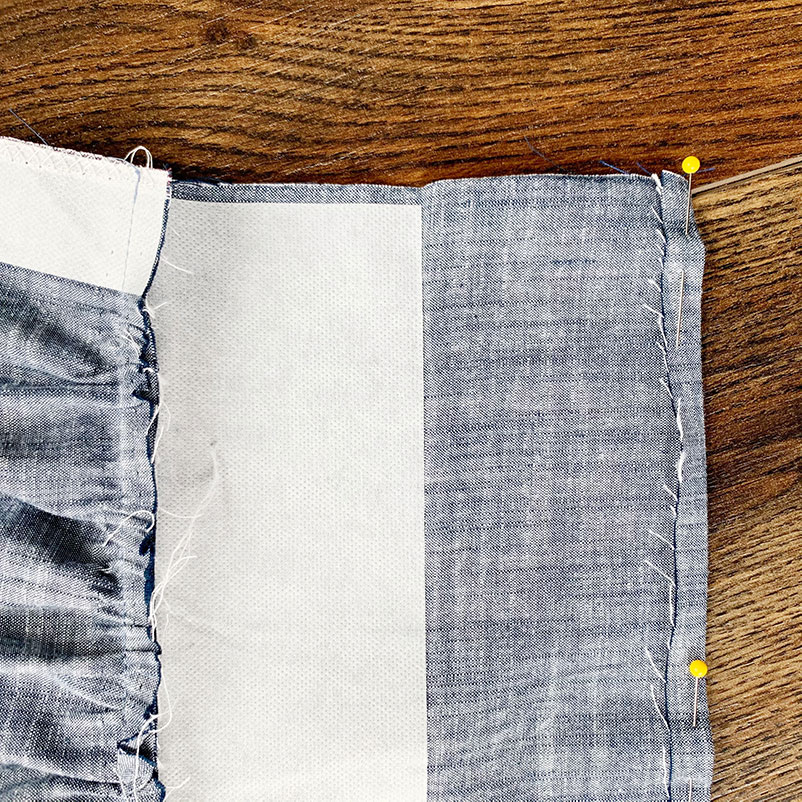
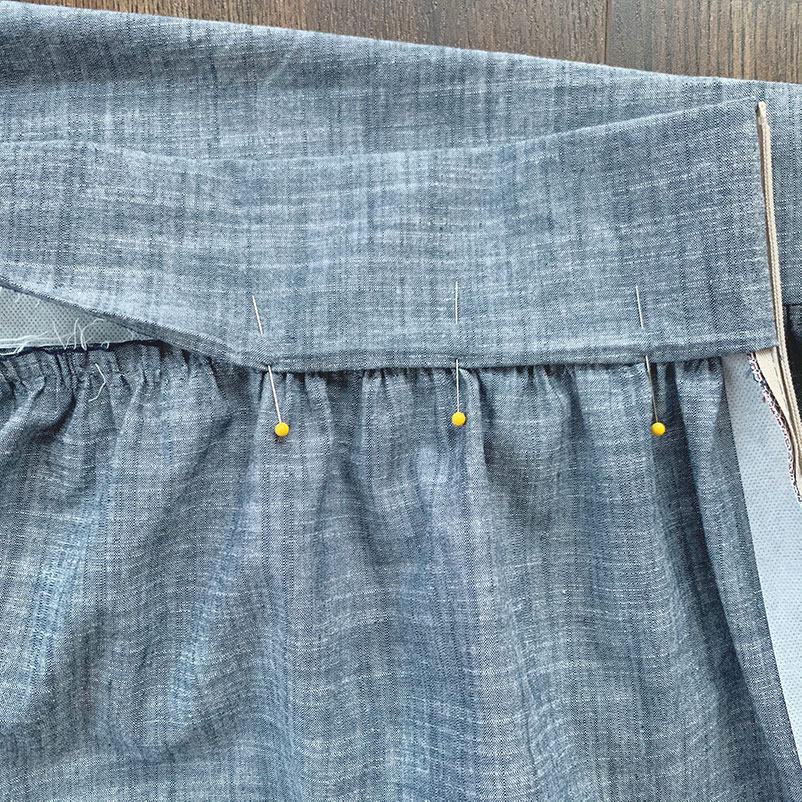
Pin the interfaced side of the waistband to the font/back pieces, right sides together. Line up the side seam to the center of the waistband and line up the other pins. Don’t gather the fabric along the interfacing for the zipper. Distribute your bunching so it is as even as possible. I like to pin every two inches or so.
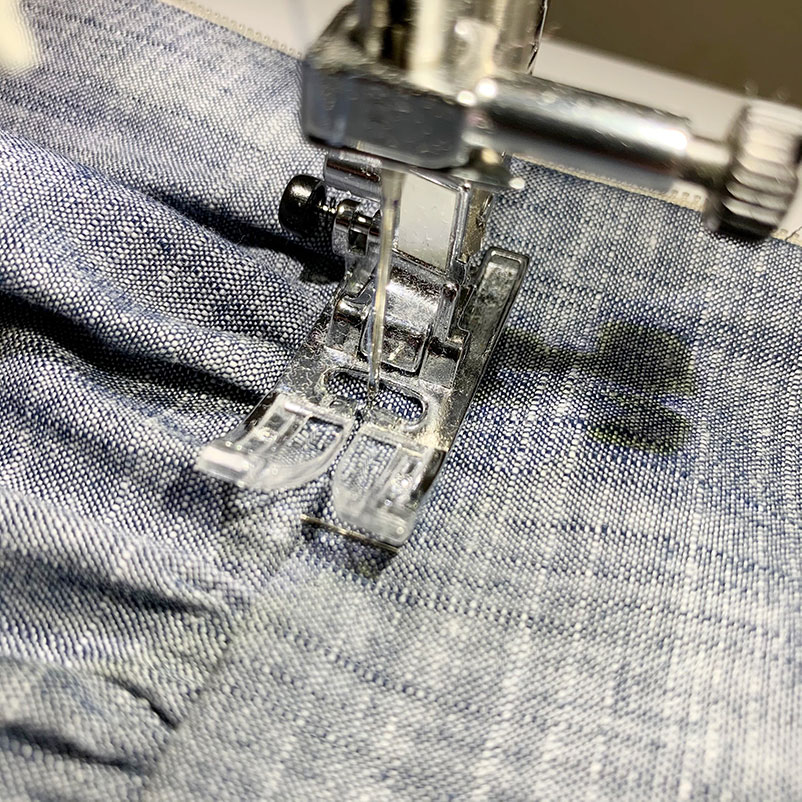
Take it to your machine and slowly sew this seam with a ⅜ inch seam allowance. Redistribute gathers as you go if needed.
Prep Waistband
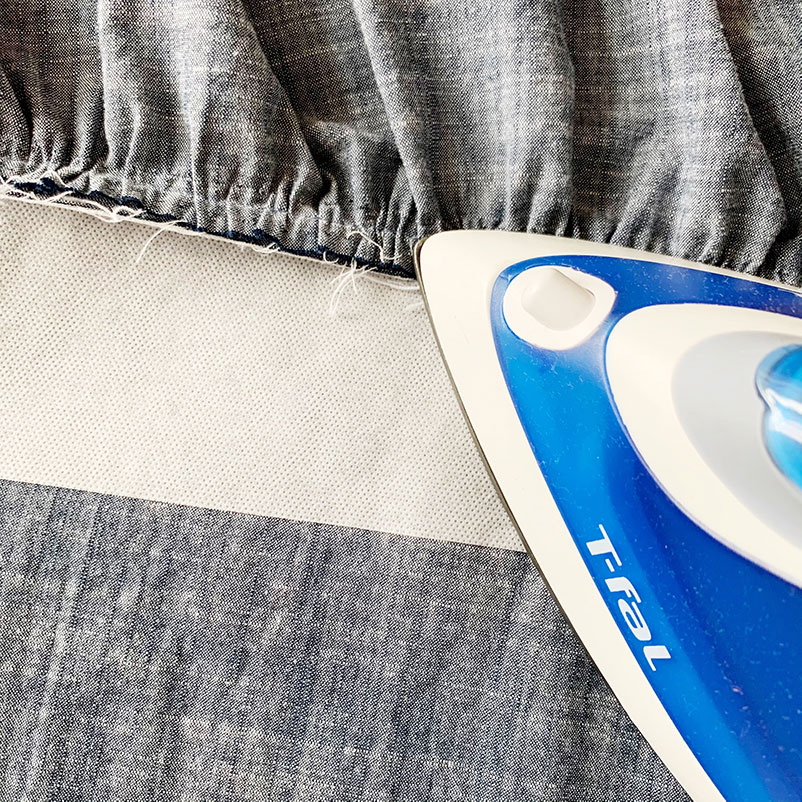
Press this seam that you just sewed up towards your waistband. You will hide all of these edges in the waistband. Be sure not to iron your gathers! I just take the tip of my iron and press along the seam.
While you’re with your iron, iron a ¼ inch hem at the top of the waistband. Ironing this now will help you later!
Insert Zipper
You don’t need a 20 inch long zipper for this skirt. You just really need the zipper to go a few inches beyond the waistband/body seam. I cut my zipper so it was ten inches long. I melted the edges with a flame. Do this super quickly and over a sink in case something terrible happens..
If you cut your zipper, take your zipper to your sewing machine and slowly sew back and forth an inch above the end of the zipper. This will stop your zipper pull from running off the end of your zipper.
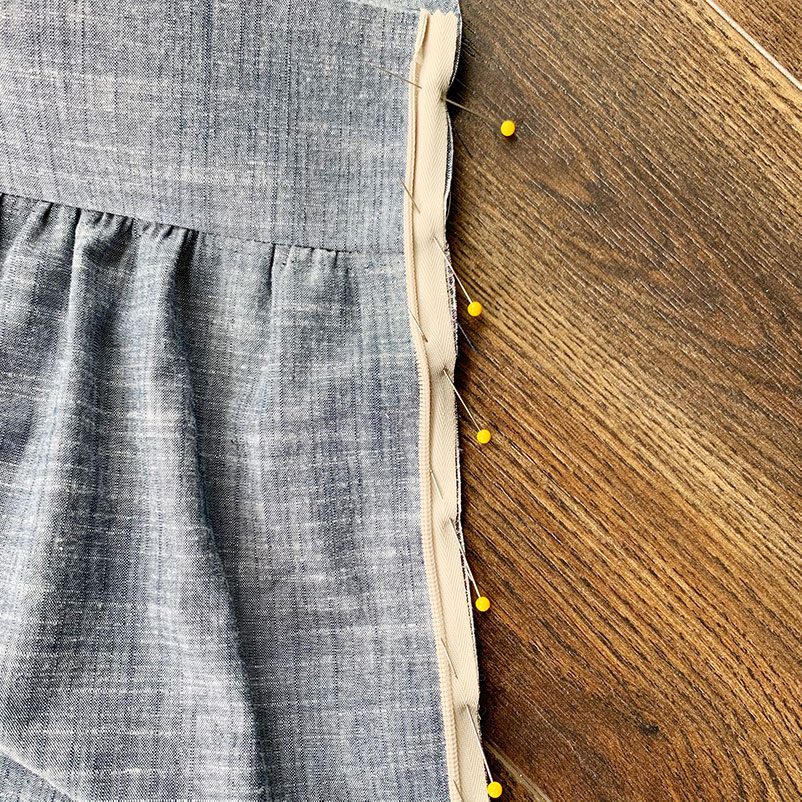
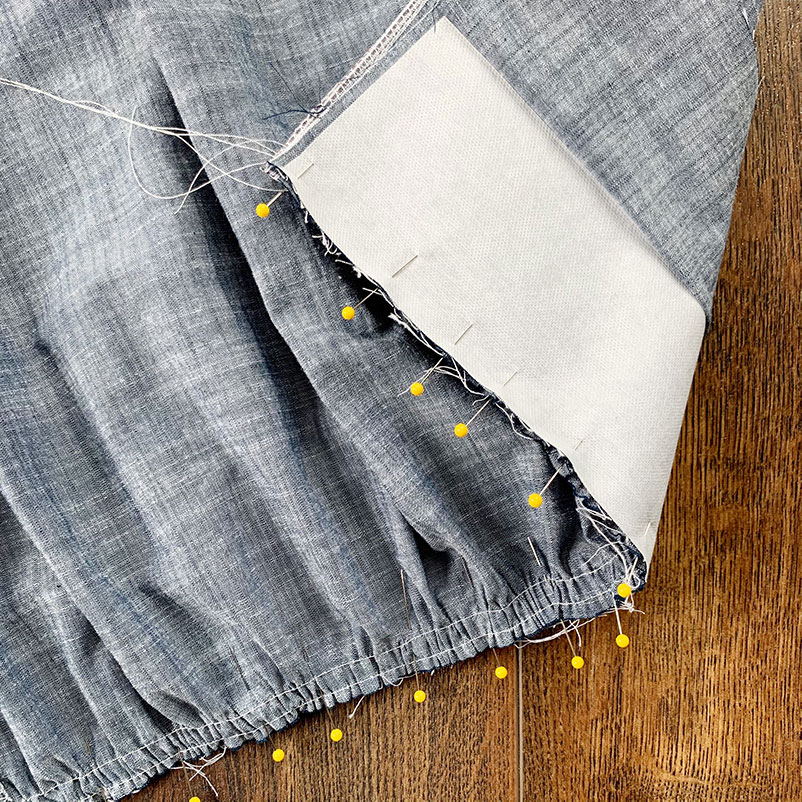
Next, we are installing the side zipper. Place the right side of your zipper (the side without the teeth) to the right side of your fabric, all the way up next to the end of the interfacing. Line up the sides and pin. Sew a set of basting stitches, just to hold your zipper in place. (You will take these out later.) Leave the bottom inch of the zipper not sewn into place.
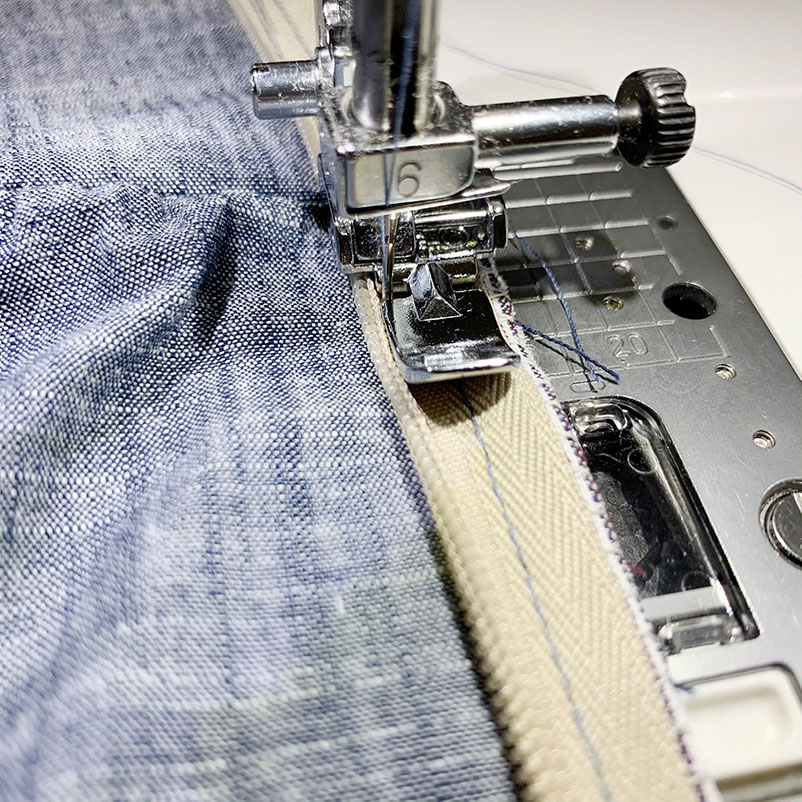
Using a zipper foot, sew the invisible zipper into place. Once again, leaving the bottom inch not sewn into the fabric. (This extra zipper space will help us close this seam.)
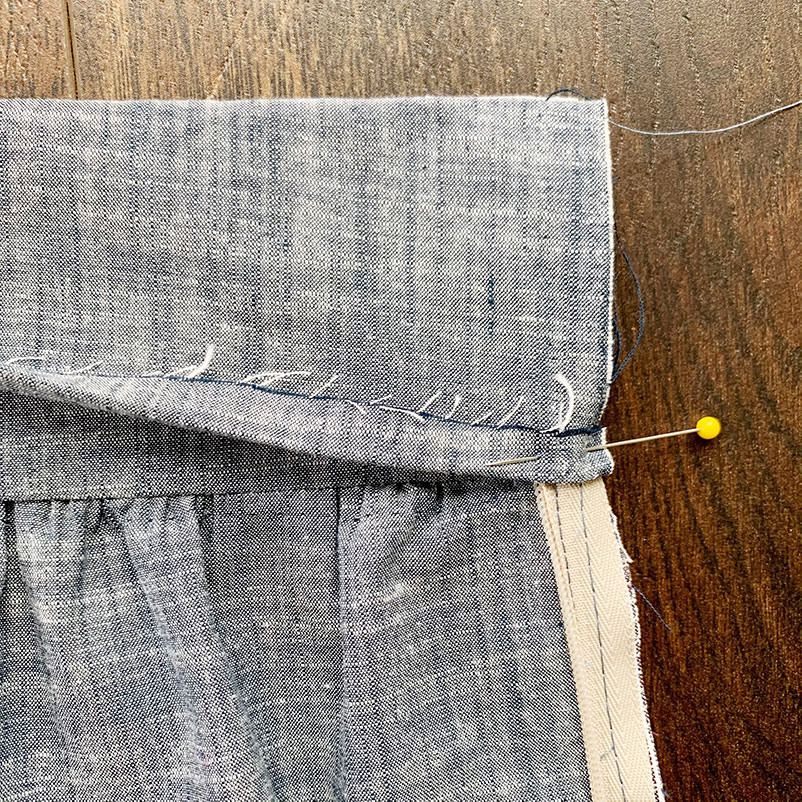
Take your waistband and fold it in half, right sides together. The fabric will lay over the zipper. Line up the side seams and pin in place. Make sure you pin the ¼ inch hem you ironed earlier. Sew the top waistband down as close to the zipper as possible. (Be sure to not sew into the zipper, this will make it unusable!) Turn this right side out and your zipper will be neatly sandwiched in the waistband!
Open the zipper and repeat the zipper install on the other side of the skirt.
Close Last Side Seam
Pin the remaining side seam together (beneath the zipper) and sew together with a ⅜ inch seam allowance. When you get close to the zipper you want to angle your stitches so they form a smooth line up to your zipper. You may not be able to get super close to your zipper that’s okay! Just get as close as you can.
Try it on! You’re so close to being done. Make sure the waistband feels okay. Move around, sit, stand, dance. Do what you gotta do.
Finish the Waistband
Next you will fold over the rest of your waistband, wrong sides together. (The above image is of the INSIDE of the skirt.) You want it to come just over the edge of the stitches that are holding the waistband to the body. Pin this into place. You want to make sure that your previous stitches can’t be seen!
Turn the skirt so it is rightsize out and stitch in the ditch to connect the inside waistband to the skirt. You want to sew painfully slow and make sure your needle hits right in the seam connecting the body and the waistband.
As you sew, try to feel the fabric underneath to make sure the machine is catching the inside waistband fabric. You can also pull out your pins as you sew along.
Hem
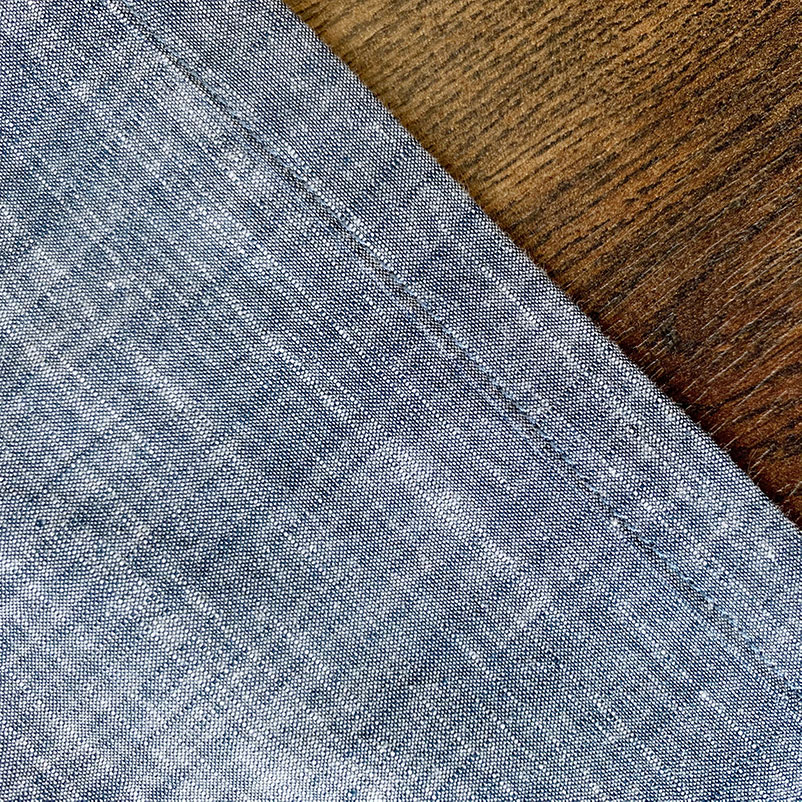
And finally, just hem the bottom of your skirt. The pattern is designed with a hem that is ⅝” folded over twice.
This is an easy place to adjust length. If you want it shorter or longer just adjust your hem!
Celebrate! You Sewed a Gathered Skirt Without a Pattern!
Woohoo! You just sewed a gathered skirt without a pattern! Hopefully you learned something along the way. You can easily modify this pattern by adding pockets, adjusting the length, adding tiers, or adding a bib and making it into a pinafore. Get creative!
If you make this skirt, please share it with me on Instagram! I would love to see your work.