DIY Magnetic Mosaic Mandala Tiles

Mandala tiles are a beautiful and interactive way for children to explore creativity, develop fine motor skills, and learn about patterns. This DIY project involves creating magnetic mosaic mandala tiles from chipboard, painting them in vibrant colors, and adding magnets so kids can arrange them on the fridge.
Not only is this craft engaging, but it also doubles as a fun educational tool. Plus, it can be done with things people probably already have around!
Why Make Magnetic Mosaic Mandala Tiles?

Mandala tiles offer a unique blend of art and play. They help children develop:
- Creativity: Kids can design patterns and experiment with colors.
- Fine Motor Skills: Handling and arranging small tiles enhances dexterity.
- Problem-Solving Skills: Arranging tiles into mandalas or other patterns encourages logical thinking.
These DIY mandala tiles are also a fun addition to your toy stash. I also love that you can customize them to your aesthetic so they fit more into your home decor.
Materials You’ll Need

To get started, gather the following supplies:
- Chipboard (Thinner version of cardboard. Mine is from a pancake mix box.)
- Scissors or a craft knife
- Template for drawing shapes (Download Here: mosiacMondalaTilesTemplate)
- Download
- Acrylic paint in various colors
- Paintbrushes
- Magnetic sheets (I always save mine when I get them for free in the mail, usually have sports schedules on them)
- Stronger glue (I used E6000)
- A clear sealant, like Modge Podge (optional, for durability)
How to Make Magnetic Mandala Mosaic Tiles
Step 1: Trace the Shapes & Cut the Chipboard

Download the template file. (It is a link in the supplies list.) Cut out the template shapes and use them to trace the shapes onto the chipboard. I find it best if you nestle them together so each shape sits right next to another. You can also easily do an entire line of squares or trapezoids to make things easier.

Once you feel like you have a good amount, cut them out.
Step 2: Paint the Tiles

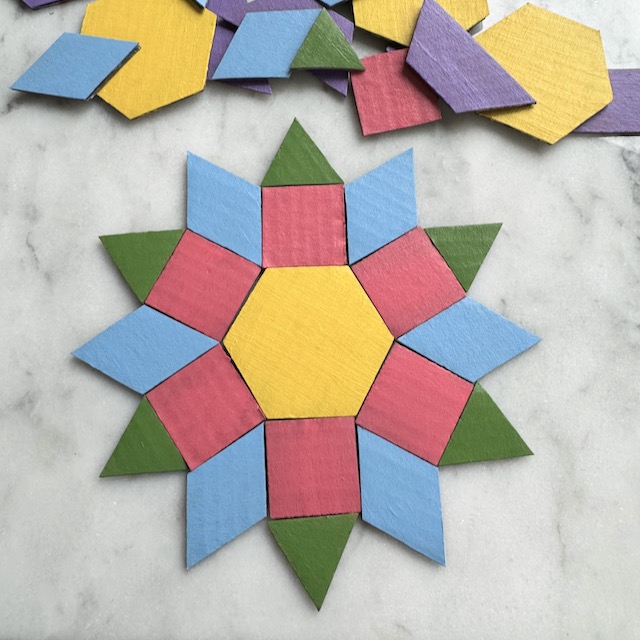
Paint the tiles using acrylic paint. For a cohesive look, choose a color palette. You can have a variety of colors (like me), or stick to different shades of the same color, or maybe just two or three coordinating colors. It’s up to you!
Step 3: Seal the Tiles (Optional)

Once the paint is dry, apply a clear sealant to protect the designs and give the tiles a polished finish. This step is optional but recommended if the tiles will be used frequently.
Step 4: Add Magnets

Trace the shapes again onto the magnetic sheet. When you go to cut the magnetic sheet, cut right inside the drawn line to ensure the magnet is slightly smaller than the chipboard shape. Glue the magnets to the back of each tile.
Step 5: Play and Display

Once the glue is dry, the mandala tiles are ready for play! Arrange them on the fridge or a magnetic board, letting kids create patterns, experiment with symmetry, or just enjoy the vibrant designs.
Conclusion
Making magnetic mosaic mandala tiles is a wonderful project that combines creativity, learning, and fun. Whether used for play, decoration, or as a unique gift, these magnetic tiles will bring joy and color to any space. Gather your materials and start crafting your own set of DIY magnetic mosaic mandala tiles today!
If you’re looking to make more toys for little ones, check out my other tutorials here. My busy board tutorial is one of my most popular posts! And these stepping stones are also a family favorite.