How to Make a DIY Busy Board for Toddlers
Busy boards, also known as activity boards, are fantastic tools for keeping toddlers entertained while fostering their fine motor skills, problem-solving abilities, and sensory development. Creating a DIY busy board allows you to customize it to your child’s interests and needs and also utilize what you may already own!
Here’s a step-by-step guide to make a busy board for toddlers, complete with ideas for engaging and safe activities to include.
Safety
If you are creating a toy for your child you need to make sure that it is safe. Be aware of smaller objects, if things can easily become loose, sharp edges, pinch points, and other potentially dangerous hazards. To ensure your child’s safety, your child should always be watched by an adult while playing with a DIY busy board and other toys you make for them.
Suggestions for Things to Add to the DIY Busy Board
Both Pinterest and Etsy have a ton of different of different ideas for busy boards. They are a great spot to find inspiration!
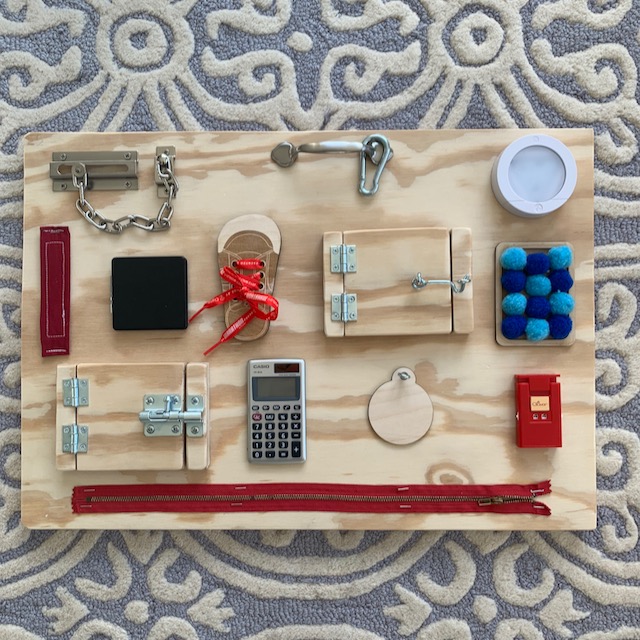
I also encouraging you to shop your home first. You probably have some fun things laying around that you could repurpose. The zipper I used came from a dress that didn’t fit. The stitch counter was for knitting, but I had not used it in years. We had a drawer pull and carabiner in our garage. Pompoms were from my kids toy stash. The shoelace was off an old shoe. The velcro was from my sewing stash.
If you’re thinking about making a busy board, read some of my suggestions below and then start to keep an eye out for things around your house, thrift stores, or a friend’s/family member’s home. Some of my favorite suggestions are:
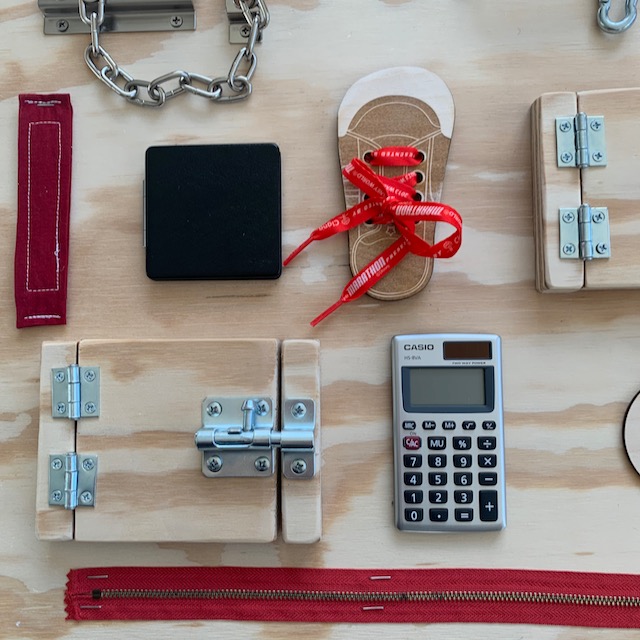
- Locks and Latches:
- Include a variety of locks, such as padlocks, chain locks, and sliding bolts. These help develop problem-solving skills and hand-eye coordination.
- Light Switches:
- Attach a puck light, light switch, or short fairy lights. Toddlers will enjoy the cause-and-effect action of flipping switches on and off.
- Zippers and Buttons:
- Staple gun or glue zippers onto the board. Add large buttons on strings and buttonholes for additional fine motor practice.
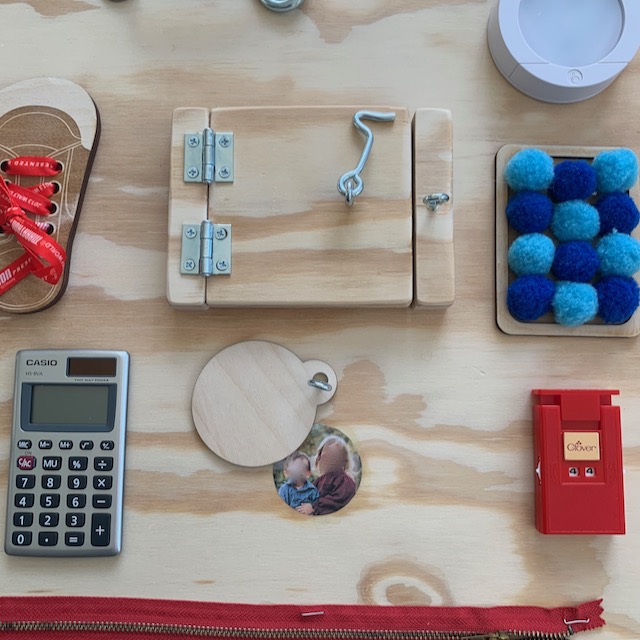
- Knobs and Handles:
- Install door knobs, cabinet handles, and drawer pulls. These items encourage twisting and turning motions.
- Velcro Strips:
- Attach strips of Velcro with matching pieces to pull apart and stick together. This is a simple yet engaging sensory activity.
- Mirrors and Reflective Surfaces:
- Small, unbreakable mirrors or reflective surfaces can be fascinating for toddlers and provide visual stimulation.
- Spinners and Gears:
- Add spinners, gears, or old rotary phone dials. These moving parts can captivate toddlers and develop their motor skills.
- Textured Surfaces:
- Incorporate various textures, such as sandpaper, felt, pom poms, textured fabric, and bubble wrap, to enhance sensory exploration.
- Knot Tying:
- Provide a string or shoelace to practice tying shoe laces. This activity promotes dexterity and concentration.
- Musical Elements:
- Include items that make noise, like small bells or xylophone keys. These add an auditory dimension to the busy board.
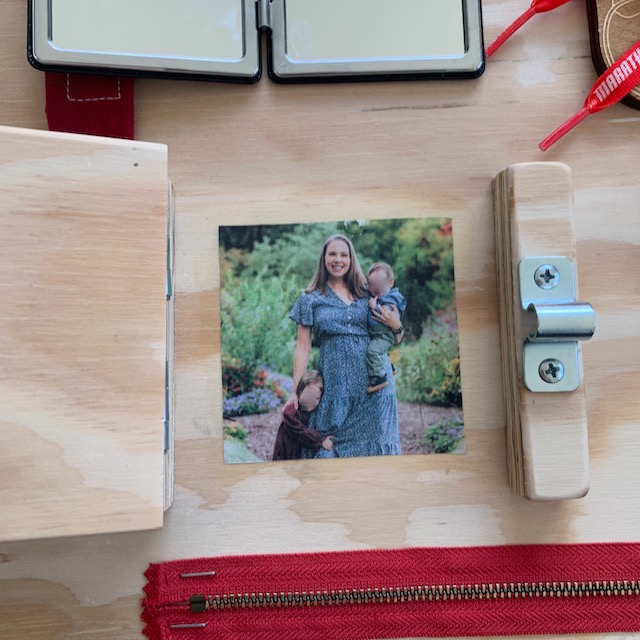
- Photos of Themselves and Family
- At a young age, kids love to see photos of themselves and people they know. I printed some out and used Modge Podge to adhere them to the board. I tucked them behind hinged doors and a little circle they can push to the side. Photos help with building relationships and memory.
- A Calculator or Old Telephone
- This is one of our family favorites. Just a cheap calculator they can press buttons on. Great for learning numbers, practicing phone numbers, and simple addition.
Materials Needed
- Wooden board: a sturdy piece of plywood or MDF (mine was approximately 2 ft x 3 ft).
- Sandpaper: for smoothing the edges and surfaces of the board.
- Paint and brushes (optional): for decorating the board.
- Screws, nuts, and bolts: to securely attach items to the board.
- Adhesive hooks, glue, and fasteners: for attaching lighter items.
- Variety of household items: see suggestions above
Steps to Make Your DIY Busy Board
- Prepare the Board:
- You can buy smaller boards at most local hardware stores. If you don’t have a saw, most stores will also offer to cut plywood down for you for free!
- If wood is holding you back from making this project, you could also consider making it out of a thick piece of cardboard.
- Sand the edges and surface of the wooden board to ensure there are no rough spots or splinters. If you choose to paint the board, do so now and allow it to dry completely.
- Plan the Layout:
- Arrange the items on the board to see how they fit together. Ensure there is enough space between each item for your child to manipulate them easily. Consider a mix of activities that require different movements, such as turning, sliding, flipping, and pressing.
- Attach the Items:
- Use screws, nuts, and bolts to secure heavier items like door latches and knobs. For lighter items, such as zippers, use glue or fasteners. Make sure all items are firmly attached to the board and do not pose any choking hazards.
- For the latches to open up to reveal photos I cut three pieces of wood, I glued down the side pieces (be sure to include enough room for the door to pivot open) and attached the door to one piece of wood with hinges, and the other piece of wood held the other side of the latch.
- Safety Check:
- Inspect the board thoroughly to ensure there are no sharp edges or small parts that could come loose. Everything should be securely fastened and safe for a toddler to explore.
- Decorate (optional):
- Add colorful paint, stickers, or other decorative elements to make the board visually appealing. Use non-toxic materials to ensure safety.
By following these steps, you can make a busy board that is both safe and engaging for your toddler.
Benefits of a Busy Board
Busy boards are more than just a fun toy; they are educational tools that can help toddlers develop essential skills. By engaging with the different elements, toddlers improve their fine motor skills, hand-eye coordination, and cognitive abilities. Additionally, busy boards can provide a safe and stimulating environment for independent play, giving parents a much-needed break.
Creating a DIY busy board for your toddler is a rewarding project that provides endless hours of entertainment and learning. Customize it to your child’s interests and watch as they explore and discover the joys of hands-on play.
Our busy board has been a family favorite and is frequently played with whenever we have other kiddos over for play dates! I hope you enjoy making one too.